WooCommerce Shipping Plugin Developer Notes

WooCommerce Logo Myfreight Logo Myparcel logo

Developer Notes

If you wish to customise the WooCommerce Shipping Plugin for Myfreight/Myparcel to your website's specific requirements, the following sections provide some guidelines on how to do this. For further assistance in customising the plugin, contact your Myfreight account manager or raise a Myparcel Support Request.


Customising the Address Helper

The Address Helper assists the customer in the correct entry of suburbs, states and postcodes, and may appear on the Cart page, the Checkout page and/or the Single Product page, depending upon your selections in the Myfreight/Myparcel administrator settings.

Note that the following plugin is required to display the shipping calculator and Address Helper on single product pages:

  • "WooCommerce Shipping Calculator on Product Page" by Magerips, with the following settings:
    Enable on product page? = Yes
    Button Position On Product Page = After Description
    Shipping Method Input = Display All Shipping With Price
    Display Shipping Message = Before Shipping Form
    Default open shipping calculator? = Yes
    Hide shipping country if ship in single country? = No


There are 3 ways to customise the styling of the Address Helper:

1. Change the input placeholder text

The placeholder text in the input fields used to select a new locality (suburb, state and postcode) may be changed to suit your requirements by entering text into appropriate field(s) in the Myfreight/Myparcel administrator settings (WooCommerce → Settings → Shipping → Myfreight Shipping).

You can even include brief instructions such as "Enter postcode then select suburb".

2. Use CSS or JS to change the styling

The Address Helper fields can be styled with CSS using selectors div#cart_locality_field or input.locality_autocomplete as the starting point.

For example, to change the width of the address helper input field on the cart page, add the following CSS to the theme's "style.css" file (Appearance → Theme Editor):

div#cart_locality_field input {
width: 300px;
}

Or to display a magnifying glass icon in all the address helper fields, add the following CSS to the theme's "style.css" file (Appearance → Theme Editor):

input#cart_locality,         /* Cart page */
input#billing_city,           /* Checkout Billing Suburb */
input#shipping_city,          /* Checkout Shipping Suburb */
input#product_locality {      /* Single Product page */
background-image: url(/wp-content/plugins/myfreightshipping/img/search-icon.png);
background-size: 24px;        /* Adjust size and position to suit */
background-position: 12px 12px;
background-repeat: no-repeat;
padding-left: 48px;
}

Suburb entry with magnifying glass

Note that the original WooCommerce "Calculate shipping" form (with 4 input fields) remains on the Cart page, but is hidden. To unhide this form, use JS to remove the class "hide_change_address" from the element div#cart_locality_field.

3. Use PHP hook to fully customise the Address Helper HTML

The Address Helper HTML can be changed or re-arranged using the WordPress filter hook 'my_locality_helper'.

Following is an example of how to intercept and modify the HTML prior to rendering the page. It uses the WordPress "add_filter" function to access the raw HTML (provided by the $html argument) before customising and returning it. The $placement argument contains text indicating the page location of the Address Helper ("cart" or "product"), so that the HTML can be modified independently for each location if required.

Insert the code into the theme's "functions.php" file (Appearance → Theme Editor → Theme Functions):

/* Customise Myfreight Address Helper HTML */
add_filter( 'my_locality_helper', 'customise_helper', 10, 2 );
function customise_helper( $html, $placement ) {
// Add your custom class used for input fields
$html = str_replace( 'class="', 'class="my-custom-class ', $html );
// Add context specific instructions below the Apply button
switch ( $placement ) {
case 'cart':       // Helper on cart page
$html .= '<p class="helper-instructions">Adding instructions on Cart page</p>';
break;
case 'billing':    // Helper on checkout page in billing column - DEPRECATED
$html .= '<p class="helper-instructions">Adding instructions on Checkout page for Billing</p>';
break;
case 'shipping':    // Helper on checkout page in shipping column - DEPRECATED
$html .= '<p class="helper-instructions">Adding instructions on Checkout page for Shipping</p>';
break;
case 'product':    // Helper on single product page
$html .= '<p class="helper-instructions">Adding instructions on Single Product page</p>';
break;
}
return $html;
}

Any PHP string manipulation functions can be used to alter the HTML as required. However, be aware that element id's and classes are used by the plugin CSS and Javascript to hide and style elements and should be modified with care.


Customising the Shipping Options Text

The shipping options list on the cart and checkout pages normally display as regular text. If you wish to highlight one or more of the special shipping options, such as Free Shipping, Priority Shipping or Customer Collect, you can do so using CSS.

To change the appearance of any shipping option text on both the cart and checkout pages, add the following CSS to the theme's "style.css" file (Appearance → Theme Editor):

/* Format free shipping */
ul.woocommerce-shipping-methods label[for$="_free"] {
font-weight: bold;
color: #b02020;
}
/* Format priority shipping */
ul.woocommerce-shipping-methods label[for$="_priority"] {
color: green;
}
/* Format customer collect */
ul.woocommerce-shipping-methods label[for$="_collect"] {
color: blue;
}

Change the styling commands as appropriate to suit your requirements.


Minimum Shipping Price and Rounding up Shipping Price

If you wish to apply a minimum charge for shipping and/or round up the shipping price to some increment so that it looks neater in the cart and checkout, you can programmatically control the shipping pricing displayed using a PHP hook. Following is an example of how to both apply a minimum charge and round up the price displayed to the website buyer.

Insert the code into the theme's "functions.php" file (Appearance → Theme Editor → Theme Functions):

/* functions.php snippet for shipping minimum rate and rounded rates */
add_filter( 'my_sort_quotes', 'modify_shipping_rates', 10, 2 );
function modify_shipping_rates( $prices, $sender_code ) {
$minimum_shipping = 10.00; // The minimum shipping cost ex GST
$shipping_rounding = 0.50; // The $ increment to round up to
$gst_percentage = 10.0; // GST percentage entered in WooCommerce Tax settings
foreach( $prices as &$price ) {
$shipping_cost = (float)$price['cost'];
// Apply minimum shipping price ex GST
if ( $shipping_cost < $minimum_shipping ) {
$shipping_cost = $minimum_shipping;
}
// Round up shipping price inc GST to increment
$shipping_cost = ceil( ( $shipping_cost * (100.0 + $gst_percentage) / 100.0 ) / $shipping_rounding ) * $shipping_rounding * 100.0 / (100.0 + $gst_percentage);
$price['cost'] = number_format( $shipping_cost, 2, '.', '' );
}
unset( $price );
return $prices;
}


Restricting Transport Carriers or Services

If you have working arrangements with one or more preferred transport carriers, you may wish to only display shipping pricing for those transport carriers or certain services provided by those carriers, rather than displaying the lowest cost shipping among all transport carriers.

You can programmatically control the shipping pricing displayed using a PHP hook. Following is an example of how to display only TNT shipping pricing in the Cart and Checkout.

Insert the code into the theme's "functions.php" file (Appearance → Theme Editor → Theme Functions):

/* Display shipping pricing for TNT only */
add_filter( 'my_sort_quotes', 'restrict_shipping_quotes', 8, 2 );
function restrict_shipping_quotes( $prices, $sender_code ) {
foreach( $prices as $index => $price ) {
if ( $price['carrier'] != 'TNT' ) {
unset( $prices[$index] );
}
}
return $prices;
}


Changing the Shipping Item Type

Shipping pricing varies according to the type of item being shipped, even if the weights and dimensions are unchanged. Couriers generally offer a lower price for Satchels compared to cartons, while large national carriers generally offer a lower price for pallets compared to cartons (as they are more easily handled with a forklift).

By default, the item type will be automatically estimated from the product weight and dimensions. If there is no clear item type, the default item type is assumed to be "Carton".

You can programmatically change both the default item type and the item type estimation calculation using a PHP hook.

1. Use PHP hook to change default Item Type

The default item type can be changed from Carton using the WordPress filter hook 'my_est_item_type'.

Following is an example of how to set the default item type to Pallet.

Insert the code into the theme's "functions.php" file (Appearance → Theme Editor → Theme Functions):

/* Customise Default Shipping Item Type */
add_filter( 'my_est_item_type', 'default_shipping_item_type', 5, 8 );
function default_shipping_item_type( $item_type, $quantity, $weight, $length, $width, $height, $shipping_class, $account ) {
return 'Pallet';
}

This will set the default item type to Pallet prior to auto item type estimation being invoked. If you wish all item types to be Pallet, simply disable "Auto Item Type Activation" in the Myfreight/Myparcel Shipping Settings.

Note that any item type specified for a product using the product's Shipping Class will still override the default item type.

2. Use PHP hook to customise Item Type calculation

You can provide your own item type estimation using the WordPress filter hook 'my_est_item_type'.

It is recommended that you start by copying and renaming the function "estimate_item_type" from the plugin file "myfreightshipping/myfreight-ancillary.php".

Insert the code into the theme's "functions.php" file (Appearance → Theme Editor → Theme Functions):

/* Customise Shipping Item Type Estimation */
add_filter( 'my_est_item_type', 'custom_shipping_item_type', 10, 8 );
function custom_shipping_item_type( $item_type, $quantity, $weight, $length, $width, $height, $shipping_class, $account ) {
// Insert your custom code here ...
return $custom_item_type;
}

This will set the shipping item type to whatever string the function returns. You should disable "Auto Item Type Activation" in the Myfreight/Myparcel Shipping Settings to prevent unnecessary processing.

Note that any item type specified for a product using the product's Shipping Class will still be passed to your custom function. You have the option of accepting or overriding Shipping Class defined item types.

The arguments passed to the 'my_est_item_type' filter functions have the following PHP types:

string $item_type (normally 'Carton', 'Satchel', 'Skid', 'Pallet' or null)
int $quantity
float $weight
int $length
int $width
int $height
string $shipping_class
string $account ('Myfreight' or 'Myparcel')


Changing the Packing Method

Whenever there is more than 1 product item in the Cart, Checkout or Order, there is the option of shipping them as individual items or packed together as a single item. The packing option chosen may affect the cost of shipping, the eligible transport carriers, and the type of shipping service required (e.g. whether a truck with tailgate lift is required because the packed item now exceeds 30kg).

If Auto Packing is activated, by default it is assumed that multiple product items will be packed together and shipped as a single shipping item or multiple shipping items if the total weight exceeds the maximum item weight specified. The final weight, dimensions and shipping item type are estimated by the plugin. Obviously, it is not possible to predict how items are packed together with 100% accuracy.

To activate/de-activate the Auto Packing estimate, simply tick/untick the Myfreight/Myparcel shipping setting "Auto Packing Activation".

If you wish to customise the auto packing calculation you can do so programmatically using a PHP hook.

1. Use PHP hook to customise Item Packing calculation

You can provide your own packing estimation using the WordPress filter hook 'my_pack_items'.

It is suggested that you start by copying and renaming the function "auto_pack_items" from the plugin file "myfreightshipping/myfreight-ancillary.php".

Insert the code into the theme's "functions.php" file (Appearance → Theme Editor → Theme Functions):

/* Customise Shipping Packing Estimation */
add_filter( 'my_pack_items', 'custom_shipping_pack_items', 10, 3 );
function custom_shipping_pack_items( $shipping_items, $pricing, $packing_item ) {
// Insert your custom code here ...
return $custom_packed_shipping_items;
}

This transforms multiple product items into minimal packed shipping items. You should disable "Auto Packing Activation" in the Myfreight/Myparcel Shipping Settings to prevent conflict between packing functions.

The first parameter passed to the hook function ($shipping_items) is an array of line items, with each line item being an array containing details of the line item (item type, quantity, weight, length, width, height). This 2-dimensional array of line items should be modified (if appropriate) and returned by the function.

The second parameter passed to the hook function ($pricing) is a boolean flag indicating whether this packing is being done for cart/checkout pricing purposes rather than order booking purposes. This informs whether only minimal details need be returned for each line item (no reference or dangerous goods fields required).

The third parameter passed to the hook function ($packing_item) is a boolean flag indicating whether any line item products have a "Packing Unit" specified in their product Shipping tab. This parameter can usually be ignored.

Please contact your Myfreight account manager or raise a Myparcel Support Request if you need assistance in customising your packing estimation.


Multiple Shipping Items per Product

If you have any products that ship as multiple items (e.g. a bed that ships in 3 flat-pack cartons), there are two ways to accommodate this.

  1. Purchase and install the WooCommerce "Product Bundles" plugin. This is best suited to when products are sold both individually and also within a bundle (i.e. both as a combined set of shipping items, as well as each shipping item being a separately purchasable product).
    OR
  2. Download and install the free plugin "Add More Shipping Fields (For Multi Part Product)" from PluginHive. This allows you to specify multiple shipping items (each with its own weight and dimensions) in the Shipping tab of a single Product's settings. This is best suited to when items are only sold as part of a product bundle. The WooCommerce Shipping Plugin for Myfreight/Myparcel supports multiple shipping items per product using this free plugin.


Delivery Address Residential or Commercial

If your online store has a method of determining whether a purchaser's delivery address is residential or commercial, a PHP hook can be used to pass this information to the Myfreight/Myparcel WooCommerce Shipping plugin. This information is used by the shipping plugin to decide whether to add residential surcharges to the shipping price for certain carriers who apply this surcharge. Normally this decision is made based on the plugin admin setting "Delivery Address Type" and the presence/absence of a Company name (if this can be determined from the User login account or checkout Shipping/Billing fields).

Insert the following code into the theme's "functions.php" file (Appearance → Theme Editor → Theme Functions):

/* Indicate whether delivery address residential (rather than commercial/business) */
add_filter( 'my_residential', 'delivery_residential', 10, 4 );
function delivery_residential( $residential, $address_type_setting, $company, $purchaser_tickbox ) {
if ( delivery address is residential ) {
return true;
} else if ( delivery address is commercial ) {
return false;
} else if ( don't know whether residential or commercial ) {
return $residential;
}
}


Allow Purchaser to Specify Delivery Date

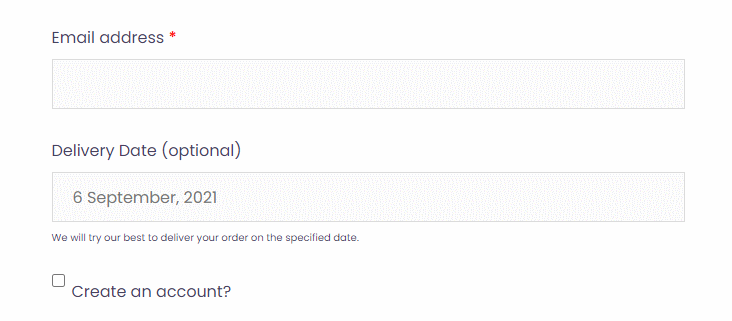
If you need website purchasers to have the option of specifying a preferred delivery date when they checkout, you can download and install a plugin called "Order Delivery Date for WooCommerce" by Tyche Softwares.

The plugin inserts a Delivery Date field below the Email Address field on the Checkout page.

Purchaser select delivery date

The Myfreight/Myparcel WooCommerce Shipping plugin will automatically detect the Delivery Date plugin and copy the requested delivery date to the "Special Instructions" in the shipping consignment. Note that this is for the information of the shipping warehouse only and does not instruct the transport carrier to deliver on the date specified.


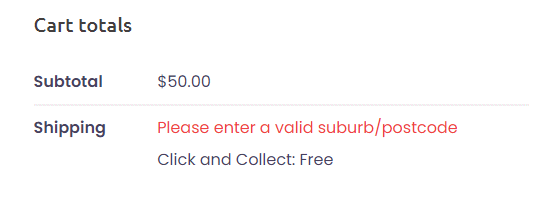
Add Message to Shipping when Suburb/Postcode Required

If the Customer Collect (Click & Collect) option is offered to purchasers, it will always appear in the Shipping section of the Cart and Checkout pages, even if a valid delivery suburb/postcode have not been entered and therefore no standard shipping options are available yet.

In order to prompt the purchaser to enter a valid suburb/postcode, add the following CSS to the theme's "style.css" file (Appearance → Theme Editor):

/* Show shipping message when suburb/postcode required on Cart and Checkout */
ul.woocommerce-shipping-methods li:only-child:before {
content: "Please enter a valid suburb/postcode";
color: #f04040;
}

The resulting red message will appear in the Shipping section when a valid suburb/postcode combination is required:

Suburb or postcode required


Show Graphic/Message During Order Submission

To display a moving graphic (spinner) on the Checkout page when the order has been submitted, first find an animated GIF file from a free GIF repository (e.g. giphy.com or tenor.com). Upload the GIF file to your child theme directory. Then add the following CSS (with URL adapted for your GIF) to the theme's "style.css" file (Appearance → Theme Editor):

/* Checkout page submit processing animation */
.woocommerce-checkout.processing .blockUI.blockOverlay {
background-image: url('/wp-content/themes/.../animated-graphic.gif') !important;
background-position: center 50% !important;
background-repeat: no-repeat !important;
position: fixed !important;
}

To display "Processing. Please wait ..." text on the Checkout page when the order has been submitted, add the following CSS to the theme's "style.css" file (Appearance → Theme Editor):

/* Checkout page submit processing text */
.woocommerce-checkout.processing .blockUI:after {
content: "Processing. Please wait ...";
font-size: 28px;
color: #000000;
position: fixed;
top: 50%;
left: 50%;
margin-top: 100px;
margin-left: -172px;
}

You can add both the graphic and text if you wish.


Shipment Tracking Notification Emails

If you wish to send tracking notifications (such as emails) to the purchaser, there is an action hook "my_shipment_tracking" available which will call your custom code when a significant change in the shipment tracking status occurs.

The major shipment tracking stages are:

  1. Booked
  2. In Transit *
  3. Delivered *
  4. Cancelled *

Within the major tracking stages are minor status variants which can also be utilised:

  1. Booked
    1. quote
    2. unbooked
    3. open
    4. despatchable
    5. despatching
    6. despatch_processing
    7. despatch_failure
    8. failed_permanently
    9. permanently_failed
  2. In Transit *
    1. picked_up
    2. in_transit
    3. on_board_for_delivery *
    4. partial_delivery *
    5. failed_delivery *
  3. Delivered *
    1. delivered
    2. delivered_with_pod
  4. Cancelled *
    1. cancelled

* Indicates those tracking stages/states which trigger the notification action when they become the active stage or state.

Note that the WooCommerce "Completed order" email will contain the initial shipment tracking information if you have enabled this email notification and ticked the Myfreight Shipping setting "Enable Shipping Info in Completed Email". The WooCommerce "Completed" state corresponds to when the order goods are ready and despatched for shipping. WooCommece does not have any states which correspond to the subsequent delivery progress (e.g. In transit, Delivered, etc.) and so the "my_shipment_tracking" hook is useful for any actions required during delivery.

To send emails to your customers when their purchased goods are picked-up (in transit) and delivered, insert your customisation of the following code into the theme's "functions.php" file (Appearance → Theme File Editor → Theme Functions):

/* Send emails when order shipment tracking status changes */
add_action( 'my_shipment_tracking', 'tracking_status_change', 10, 6 );
function tracking_status_change( $order, $con_info, $old_tracking_stage, $new_tracking_stage, $old_tracking_status, $new_tracking_status ) {
// Generate shipping message based on tracking stage and status
switch ( $new_tracking_stage ) {
case 'In Transit':
if ( $new_tracking_status == 'on_board_for_delivery' ) {
$email_message = "Your order should be delivered today.";
} else if ( $new_tracking_status == 'failed_delivery' ) {
$email_message = "There was a problem when we attempted to deliver your order. Please contact us.";
} else {
$email_message = "Your order has been shipped from our warehouse.";
}
break;
case 'Delivered':
if ( $new_tracking_status == 'delivered_with_pod' ) {
$email_message = "Your order has been delivered and signed for.";
} else {
$email_message = "Your order has been delivered.";
}
break;
case 'Cancelled':
$email_message = "The shipment for your order has been cancelled.";
break;
default:
return;
}
// Send email containing shipping message
$to = array( $order->get_billing_email() );
$headers = array(
'From: ' . get_bloginfo( 'name' ) . ' <' . get_bloginfo( 'admin_email' ) . '>',
'Content-Type: text/html; charset=UTF-8'
);
$subject = 'Order #' . $order->get_id() . ' Delivery Notification';
$body = 'Shipping update for your order #' . $order->get_id() . ' from ' . get_home_url() . ': ';
$body .= $email_message;
$body .= 'To track your delivery go to: ' . $con_info['tracking_link'];
wp_mail( $to, $subject, $body, $headers );
}