
Installation
Follow the instructions below to install and configure the plugin. If you require assistance in setting up the plugin we are happy to help. Please contact your Myfreight account manager or open a Myparcel Support Request.
- Download the latest Myfreight/Myparcel Shipping Plugin zip file to your PC:
- Login to your WooCommerce website as WordPress Administrator.
- Back up the website database.
- Go to the Plugins page and deactivate any previous version of the Myfreight Shipping plugin.
- Clear any cache enabled on your system (e.g. A cache plugin with object caching or page caching).
- At the top of the Plugins page click the Add New button.
- At the top of the Add Plugins page click the Upload Plugin button.
- Browse to the zip file downloaded in step 1. Select and click Open to upload.
- Click Install Now.
- If a previous version of the plugin is already installed, click Replace current with uploaded.
- The Myfreight/Myparcel Shipping plugin will be installed.
- Click Activate Plugin. You will then be returned to the Plugins page.
- Scroll to the plugin called Myfreight Shipping and click Settings. Alternatively, you can always go to WooCommerce → Settings → Shipping and click Myfreight Shipping immediately below the Shipping tab to open the plugin settings page.
- You will see the Myfreight/Myparcel Shipping settings page.
- Adjust the settings according to your needs (see Configurable Settings below for a description of the settings available).
- Apart from the first section (Feature Activation) and last section (Shipping Account onwards), other settings can initially be left as the default.
- Note that Account Type selection and API credentials entry are necessary for shipping pricing to display.
- If you ship mainly to commercial (i.e. non-residential) addresses, it is recommended that you change the Delivery Address Type to "Commercial" to prevent residential surcharges being added to some transport carrier prices.
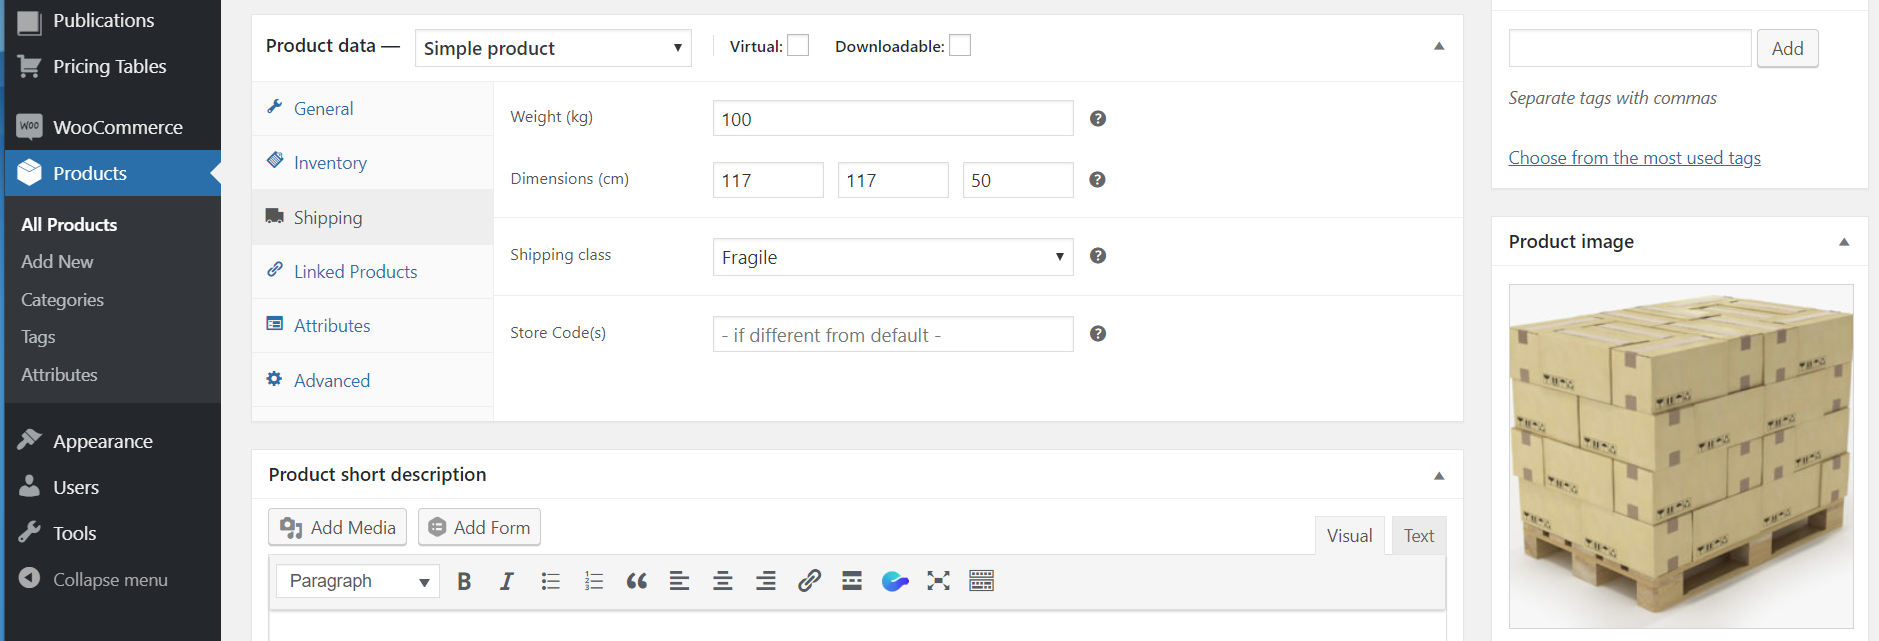
- Default product weight and dimensions can be specified until actual product weights and dimensions are entered in the individual product shipping tabs (below).
- Note that Markups can be positive (to profit from shipping), or negative (to discount shipping).
- Refer to the Packing Settings section for information regarding the Auto Packing feature and instructions on how to configure optional custom Packing Rules.
- Myparcel customers should also refer to the Myparcel WooCommerce Integration section below for details on how to set up WooCommerce and Myparcel to work together.
- Click Save Changes at the bottom of the settings page.
- Go to Appearance → Customise → WooCommerce → Checkout
- Company name field: Optional or Required depending on your target market.
- Address line 2 field: Optional
- Phone field: Required (This is required for shipping if the optional Shipping Phone is not entered.)
- Click Publish.
- Go to WooCommerce → Settings → General
- Complete the Store Address fields as the primary shipping pickup address.
- Selling location(s): Sell to specific countries only
- Sell to specific countries: Australia
- Enable taxes: As required for your website. Tick if GST to be applied.
- Go to WooCommerce → Settings → Products → General
- Weight unit: kg
- Dimensions unit: cm
- Go to WooCommerce → Settings → Tax
- Confirm that Tax options are correct for your requirements. Normally prices are entered and displayed inclusive of tax, and the Shipping tax class is Standard.
- Confirm that appropriate tax rates are applied to shipping (e.g. under Standard Tax Rates tab, if GST to be applied tick the Shipping box).
- Go to WooCommerce → Settings → Shipping → Shipping zones
- Disable any other WooCommerce shipping methods for Australian destinations to prevent extraneous shipping prices from displaying. You may leave certain shipping methods enabled, such as Free or Flat Rate shipping for orders over a certain $ amount, as required. However, we recommend you instead enable these via the Myfreight/Myparcel plugin if possible.
If a "Click & Collect" option is required, it may be better to enable the integrated Customer Collect option in the Myfreight/Myparcel plugin settings rather than adding it as a shipping method here.
- Disable any other WooCommerce shipping methods for Australian destinations to prevent extraneous shipping prices from displaying. You may leave certain shipping methods enabled, such as Free or Flat Rate shipping for orders over a certain $ amount, as required. However, we recommend you instead enable these via the Myfreight/Myparcel plugin if possible.
- Go to WooCommerce → Settings → Shipping → Shipping Options
- Calculations: Click Enable the shipping calculator on the cart page in order to use the Address Entry Helper on the cart page.
- Shipping destination: Click Default to customer billing address if you are unsure about this setting.
- Go to WooCommerce → Settings → Shipping → Shipping Classes
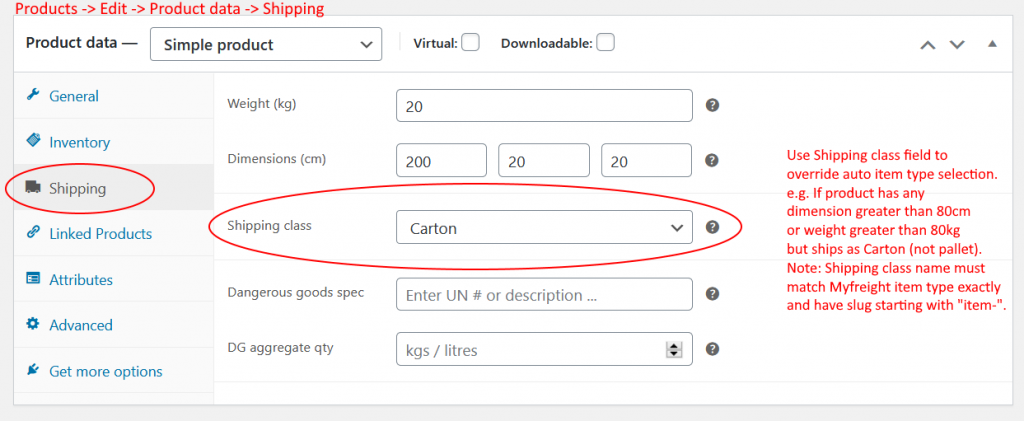
- Add a new shipping class called Fragile (leave Slug empty so that it defaults to fragile).
- If you have a Myfreight account with dangerous goods enabled, add a new shipping class called Dangerous Goods (allow default slug).
- See Products notes below for how to apply the new shipping classes to any products which are fragile (require manual handling during shipment) or contain dangerous goods/hazardous materials as appropriate.
- Optionally, add a new shipping class for each supported Myfreight/Myparcel "item type". This will allow you to override the auto item type selection and specify how individual items are shipped. The shipping class names must exactly match the spelling and case of the Myfreight/Myparcel item types available. The shipping class Slug field must begin with "item‑" to indicate that the class represents an item type. See below how to apply the new shipping classes to products. To set up some common shipping class item types, add shipping classes with names and slugs as follows:
SHIPPING CLASS NAME SLUG APPLIES TO Pallet item-pallet Myfreight & Myparcel Skid item-skid Myfreight & Myparcel Carton item-carton Myfreight & Myparcel Satchel item-satchel Myfreight & Myparcel 500g Satchel item-500g-satchel Myfreight custom item type 1kg Satchel item-1kg-satchel Myfreight custom item type 3kg Satchel item-3kg-satchel Myfreight custom item type 5kg Satchel item-5kg-satchel Myfreight custom item type Fragile fragile-goods Myfreight & Myparcel Dangerous Goods dangerous-goods Myfreight DG configured
- Go to Products → All Products
- If the product shipping fields have not been completed, either:
- Edit each product and complete the fields in the Shipping tab, or
- Export all products (including custom meta data) to a CSV, complete shipping weight, dimensions, shipping class, packing unit, store and DG columns as required, and then Import the shipping fields (refer to the WooCommerce Product CSV Importer and Exporter documentation).
- Note that the shipping weights and dimensions apply to the product as it is when packed individually ready for shipping.
- Product variations need shipping settings to be completed only if they differ from the parent product settings.
- You can override auto-selection of the shipping item type (for a single product or variation item) by changing the Shipping class of the product or variation to an item type. You must have previously set up Shipping classes with exactly the same names as the item types available in Myfreight/Myparcel, as described above. Note, however, that if the item is subject to Packing Rules or Auto Packing the item type will be overridden by the container item type.
- If the product shipping fields have not been completed, either:
- The plugin should be ready to go! If pricing was enabled, shipping prices will be shown at the bottom of the WooCommerce Cart and Checkout pages.
Configurable Settings
The following settings allow you to customise the plugin operation to suit your online store and delivery requirements.
Further instructions are provided on the settings page itself.
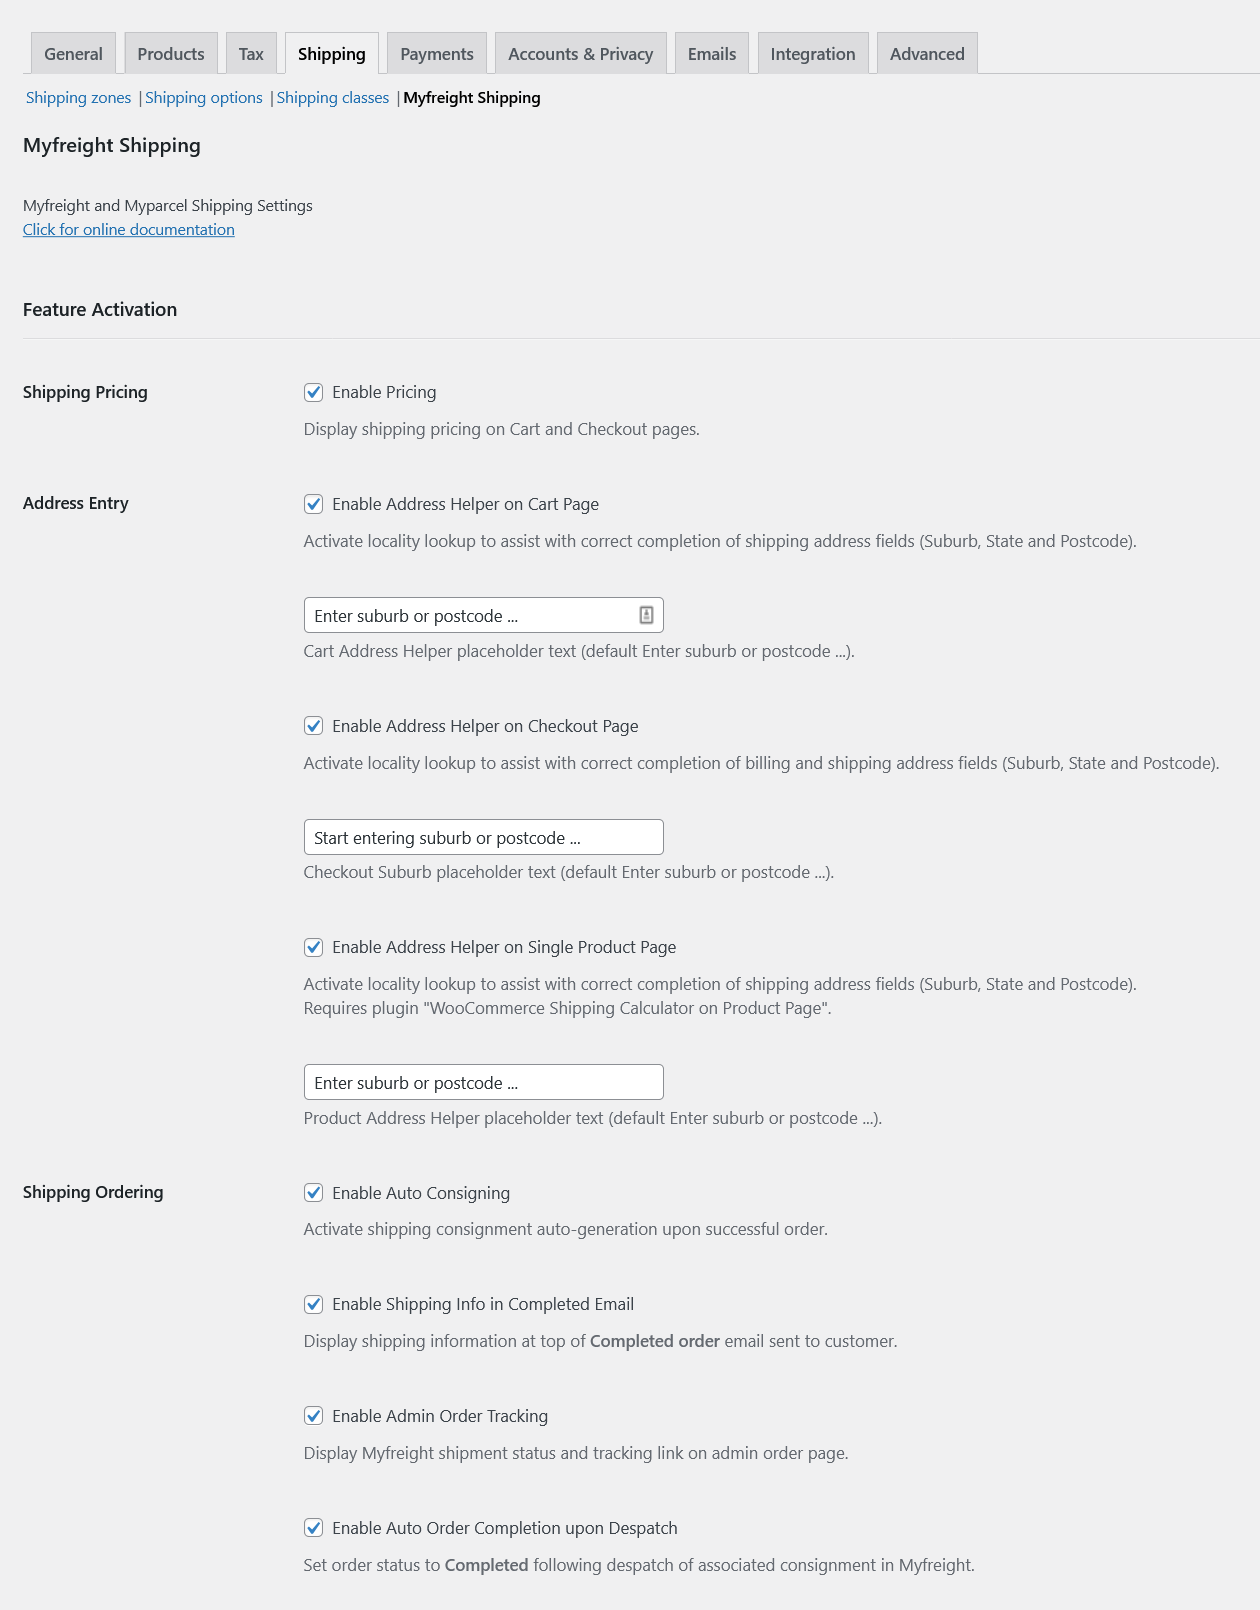
- Activate or de-activate features:
- Real-time Shipping Pricing.
- On Cart page and Checkout page.
- Address Entry Helper.
- On Cart page.
Replaces WooCommerce address fields with single suburb/postcode selector field.
- On Checkout page.
Activates selector within WooCommerce Suburb and Postcode address fields (Billing and Shipping).
- On Single Product page.
Requires plugin "WooCommerce Shipping Calculator on Product Page" by Magerips. See the Developer Notes section for information on the required settings for this plugin to work.
- Option to customise input "placeholder" text on each page.
- On Cart page.
- Auto consignment pre-fill upon successful order.
- When status of an order changes to processing, a consignment for that order will be generated in Myfreight/Myparcel and populated with shipping data.
- A button linking to the Myfreight consignment or Myparcel booking will be shown on the admin order page.
- Option to display shipment status and a button linking to Myfreight tracking on the admin order page.
- Option to automatically set order status to completed when shipment despatched in Myfreight.
- Real-time Shipping Pricing.
- Address Accuracy Threshold %
- Extent of auto-correction applied to entered delivery addresses (suburb, state and postcode only). Default 80.
- Maximum Price Selections
- Number of shipping price options to display to customer. If set to 1 the customer is not given the option to select.
- Price Selection Display:
- Display Carrier name to customer.
- Display Service description to customer.
- Specify which carrier details to display.
- Default price option text.
- Display this option text instead of carrier service.
- Customer Collect:
- Specify whether to display Customer Collect (Click & Collect) free shipping option.
- Specify text to display for Customer Collect option.
- Markup to apply to shipping prices:
- Markup $ amount (positive or negative values accepted).
- Markup % increase (positive or negative values accepted). This is applied after the Markup $ amount.
- Minimum Price
- Optional minimum shipping price ex GST to display to purchaser.
- Rounding
- Option to round up either ex GST or inc GST amount to nearest dollar.
- Default Price
- Optional fallback shipping price in the rare event that the API is down.
- Default Item Weight
- Optional fallback weight where not specified for product (kg).
- Can be used for testing. It is advisable to clear this field once all products have their shipping weight assigned.
- Default Item Dimensions
- Optional fallback dimensions (length, width and height) where not specified for product (cm).
- Can be used for testing. It is advisable to clear these fields once all products have their shipping dimensions assigned.
- Surcharges
- Many transport carriers add surcharge amounts to their standard shipping prices under certain circumstances.
- Surcharges may be added to the WooCommerce shipping price in order to anticipate such circumstances. (e.g. fragile or heavy products).
- Surcharge fields assist with predicting actual invoiced transport carrier costs and thereby helping to choose the lowest cost carrier service.
- Residential Surcharges apply to TNT, Toll, Cope and Northline services (at the time of writing) when a delivery is to a non-commercial address. TNT residential surcharges are weight-based and up to 3 residential surcharges may be applied. Use the "Delivery Address Type" field to indicate whether residential surcharges are applicable.
- The Unloading Weight Threshold determines when the Unloading Assist Surcharge is applied. Most carriers do not allow drivers to lift items heavier than 30kg (approx.) and require a mechanical lift to assist at delivery. Be sure to clear this field if you mainly ship to purchasers who are able to unload heavy items themselves.
- The Receiver Unloading Capability option enables a tickbox to be displayed in the Cart and Checkout to ask the purchaser whether the receiving address has self-unloading facilities, such as a forklift or loading dock.
- The Fragile Surcharge is only applied when the Fragile shipping class has been created and applied to a product.
- As surcharges are not applied consistently by carriers, these values may need to be refined to suit your location, local carriers and products shipped.
- Packing Containers
- For combining multi-product orders into custom packing containers for shipping (e.g. wine bottles ordered individually will be packed into boxes for shipping). Refer to the Packing Settings section for more information.
- Packing Rule Activation.
- Allow specific "custom" packing rules to be applied to shipping pricing and ordering.
- Packing Rules.
- Enter packing rules in CSV (or tab delimited) format as described in the template provided.
- For rules to work, Packing Unit names must be applied in the Shipping tab for all products which are to be packed.
- Auto Packing Activation.
- Pack products into a single container for shipping (or multiple containers if weight limit specified).
- Container item types are estimated based on weight and dimensions, unless disabled below.
- Can be used with packing rules and is applied after packing rules.
- Works best when there is a mixture of product weights, shapes and sizes in one order.
- Can specify minimum number of items to trigger auto packing, and maximum content weight per container.
- Auto Item Type Estimation Activation.
- Set all items/containers to estimated type for shipping.
- If not activated, all items/containers will default to Carton.
- Store/Warehouse Shipping Details
- Shipping contact information for primary store/warehouse.
- These fields complement the Store Address entered in the WooCommerce General Settings.
- Multi Store
- Used to activate multiple store location functions (for pricing and shipping).
- Shipping price is calculated by comparing the cost of shipping from each nominated warehouse and choosing the cheapest option.
- Default Store Code(s)
- Identify which stores/warehouses to use for pricing comparisons (except where specific store code(s) specified for products).
- Store Locations
- Enter list of all stores/warehouses including address and contact information in CSV (or tab delimited) format as described in the template provided.
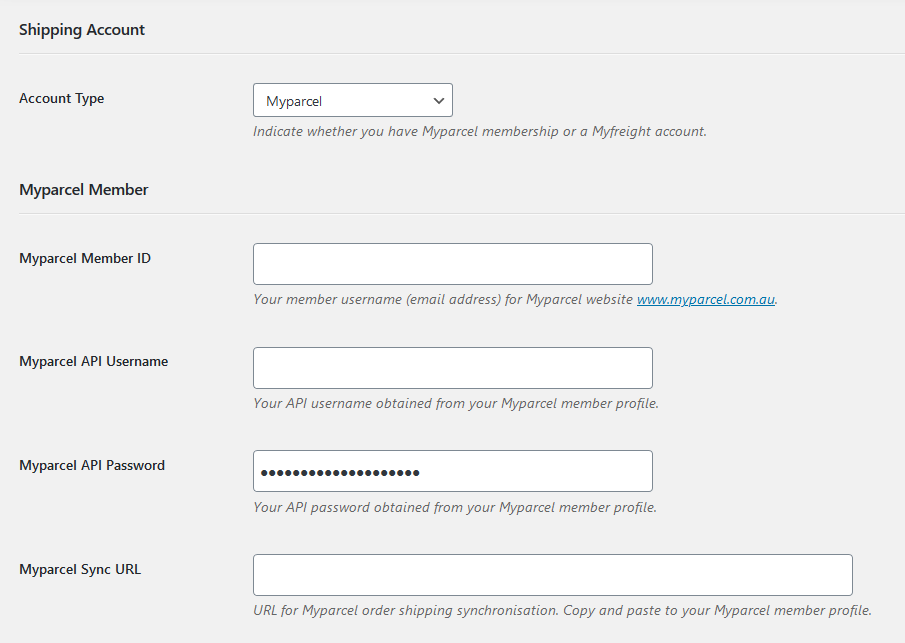
- Account Type
- Indicate whether you have a Myfreight account (for high volume shippers) or a Myparcel account (for low volume shippers).
- API Username and Password
- Required to access your Myfreight/Myparcel API for pricing and consignment/booking generation.
- Myfreight Customer Code
- Enter the customer site code provided by Myfreight. Note that Myparcel customers do not use this field.
- Myparcel Member ID
- Your account login identifier in Myparcel. Refer to the Myparcel WooCommerce Integration section below for details on how to set up WooCommerce and Myparcel to work together. Note that Myfreight customers do not use this field.
- Myparcel Customer Code
- Copy the customer site code from you Myparcel Profile page.
- Myparcel Sync URL
- You must copy this to your Myparcel member profile in order to synchronise WooCommerce orders with Myparcel shipment bookings. Note that Myfreight customers do not use this field.
- Order Completed
- For Myparcel customers only, indicate whether an order should be removed from the pending shipments list when its status changes to Completed.
- Supported Item Types
- Indicate which item types you ship products in.
- These settings are used by the Auto Item Type and Auto Packing features to determine shipping container options.
- Myfreight customer accounts can be set up to ship both standard and non-standard items, such as specific satchel weights. Tick the boxes to indicate which item types have been configured for you in Myfreight. This will enable the auto-classification of products as those item types for shipping.
- Myparcel customers can prevent the auto-classification of products as satchels by unticking the Satchel tickbox, or skids and pallets by unticking those boxes respectively.
- Test Mode
- Activate test mode of operation which uses the test API. Note that Myparcel customers should not use this field unless requested to do so.
- Debug Logging
- Activate plugin debug message logging to WooCommerce Status Logs.
Shipping Item Types
Most transport carriers support the following basic item types:
- Satchel
- Carton
- Skid
- Pallet
Transport carrier pricing may vary depending on the item type, even if the weight and dimensions of the goods are the same. Therefore, shipped products should be assigned the correct item type to assist in accurate price prediction and selection of the best transport carrier service.
Following is the procedure used to determine the item type when pricing or consigning orders:
- If Packing Rules apply to a product, the item type of the packing container will be used when calculating pricing. Note that the product Packing Unit and quantity are used to determine whether any packing rules are to be applied to an item. Refer to the Packing Settings section for details.
- If Auto Packing is applied to a product, it will use the estimated item type of the packed items. Note that the Auto Packing Minimum Qty setting is used to determine whether Auto Packing is to be applied to carts/orders. Refer to the Packing Settings section for details.
- If the product Shipping class is a valid item type, it will assume the item type of the Shipping class. Note that the class name must exactly match the the Myfreight/Myparcel item type, and have a Slug beginning with "item-" to indicate that the class is to be used to override the item type.
- The product Shipping weight and dimensions are used to estimate the item type. However, if the Myfreight plugin setting Auto Item Type is set to Deactivate Estimating then this is not applicable.
- If none of the above apply, the item type defaults to "Carton".
Setting up the Myparcel WooCommerce Integration
If you are a Myfreight customer you can ignore this section.
To prepare for using Myparcel for WooCommerce shipping, complete the following steps:
- Sign Up for a Myparcel member account
- Login to your WooCommerce online store as shop administrator and go to WooCommerce → Settings → Shipping → Myfreight Shipping
- Scroll to nearly the bottom of the page and set the Shipping "Account Type" to Myparcel
- Enter your Myparcel login username (email address) from step 1. into the "Myparcel Member ID" field
- Copy the "Myparcel Sync URL" field content
- Click the Save changes button
- In a different tab, login to your Myparcel member account (unless already logged in from step 1. above)
- Go to the Update Profile page
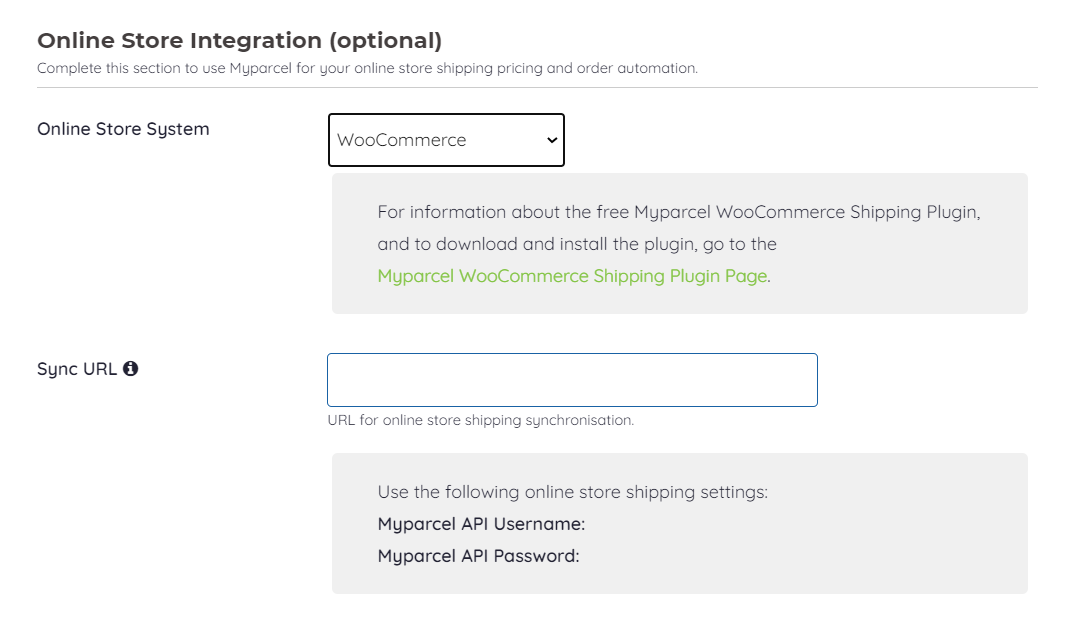
- Scroll to the bottom and set the "Online Store System" to WooCommerce
- Paste the Myparcel Sync URL (from step 5.) into the "Sync URL" field
- Click the UPDATE button then return to the Update Profile page
- Copy and temporarily store (e.g. in Notepad) the "Myparcel API Username", "Myparcel API Password" and "Myparcel Customer Code" data which now appears at the bottom of the page
- Return to the WooCommerce Myfreight Shipping Settings tab
- Paste the Myparcel API Username, Password and Customer Code (from step 12.) into the corresponding fields
- Click the Save changes button
- Your WooCommerce online store shipping is now integrated with Myparcel
Following are the WooCommerce Myfreight Shipping Settings to be completed for Myparcel integration ...
Following are the Myparcel Member Profile Online Store Integration settings to be completed ...
Now that the Myparcel WooCommerce integration is set up, when an order is placed in WooCommerce which requires shipping, it should be visible in the Myparcel Member Dashboard page. Refer to the Administrator Operation section for more details.
For assistance in setting up the Myparcel WooCommerce integration, raise a Support Request.